

Starting seeds indoors is a great way to kick start your garden. You can start vegetable or flower seeds in your home. For the best success you will want to collect seed starting supplies. Finding the best seed starting trays will help you give your roots the best start and help you manage moisture and light for the best start. Below you can find our suggestions for the 5 best seed starting trays.
We’ve been starting seeds indoors for 20 years and have tried many different seed starting set ups. You can find everything you need to know to select the best trays and get started early on your vegetable garden below.
Want to get a complete set up for starting seeds? Check out the Best seed starting kits or learn more about How to Start Seeds indoors. We also offer a mini-course on how to start seeds indoors: Learn more about our course.
Contents
Quick Look at the Best Seed Starting Trays
The seed starting trays below are 5 great options for starting seeds indoors. The exact best seed starting trays for you will depend on whether you have other supplies such as a heat mat, grow lights and trays.
In general, you should look for a solid seed starting tray with deep cells. If you are working on trays with just a few cells, you will also need to purchase a larger tray that can hold the small seed starting trays and a clear plastic cover. These supplies are often sold as a set.
If you simply want one simple, well priced option, this is the best overall seed starting tray This is a great option for starting seeds indoors.
Best Overall Seed Starting Trays | |||
Best Simple Seed Starting Trays | |||
Best Biodegradable Seed Starting Tray | |||
Best Sturdy, Reusable Seed Starting Tray | |||
Best Complete Seed Tray Set up |


Do you Need Seed Starting Trays?
You need seed starting trays to begin seeds indoors. It is possible to use the supplies you might have lying around such as cups or pots, but seed starting trays typically come with individual cells that make it easy to start many seeds indoors.
The best seed starting trays also have built in drainage and give you maximum control over soil, moisture, fertility and heat.
How to Select the Best Seed Starting Trays
So what are the important things to look for when selecting the best seed starting trays? Below you can see some important things to consider:
Overall Tray Size and Number of Cells
How big the tray is and how many trays/cells come in the set is an important consideration. If you plan to grow your seeds in trays that can be places on a windowsill, you will want to look for trays with just 4-6 cells. On the other hand, working with larger trays with more cells can be more efficient if you are growing a large number of seeds.
Cell Size
The individual size of each cell dictates how much room your seedling’s roots will have. For small cells, you will likely need to transfer your seedling into a large cell of pot for a few weeks before planting them outside. If you have space, I would recommend growing your seeds in the biggest cells possible from the start.
Accessories
Some of the best seed starting trays described below also some with accessories. This includes a tray for the seed trays to sit inside, a dome for seed starting and retaining moisture, and even a heat mat and grow lights.
Tray Material
The best seed starting trays are made from a durable material that can be used over and over again. Several of the options for the best seed starting trays listed below are actually dishwasher safe making them very durable and easy to clean.
Details of the Best Seed Trays
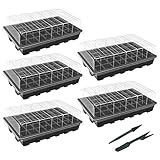
Gardzen 5-Set Garden Propagator Set
This is a simple and no-frills seed tray set up and all you really need to get started. Each seed tray set up comes with a tray with cells with drainage at the bottom. The set also comes with a bottom tray that is solid to catch water. This keeps the seedlings at a consistent moisture.
This tray set also comes with a dome, or plastic lid. This is ideal for keeping seeds moist until they germinate. Cells are 1.4 x 1.4 inches and is 1.85 inches deep making this ideal for starting seeds and transplanting outside early or transferring to a tray with larger cells.
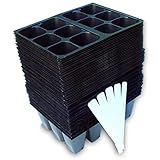
720 Cells Seedling Starter Trays
These seed starting trays are simply the small trays with cells. This is the best option if you already a seed starting tray base and a dome. Each tray has 6 cells that are 1.5 inches square and 2.25 inches deep. This set comes with 120 individual trays that can be reused.
This is the best seed starting tray if you already have some supplies and are ready to build up you operation.

Organic Biodegradable Seedling Pots
The biggest benefit of these biodegradable seedling tray is that the seedlings can be planted directly into the garden in the seedling tray significantly cutting down on root disturbance. You can find many options for biodegradable pots. The biggest negative is that you will need to buy new seed starting trays every year.
Each cell has a hole for drainage and while we’ve found them sturdy, it is possible that the seed trays will start to break down before you are ready to move the seeds into the garden.
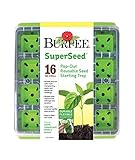
Burpee SuperSeed Seed Starting Tray
This is a sturdy seed starting tray that can actually be run through the dishwasher to clean. The cells have push button at the bottom, making it easy to get the seedlings out. In addition, the cells on this tray are all large, coming in at 2 inches square. This means you can grow more types of seeds and will need to worry less about transplanting.
The downside of this tray is that it doesn’t come with a dome for germination and this will need to be purchased separately.

Kirababy Seed Starter Tray with Grow Light
This seed starting kit has the added bonus of coming with a grow light. This also makes this tray more expensive. This is the only seed starting tray on the list that we haven’t tried, but I am planning to purchase this and try it this growing season and it gets great reviews.
The tray is also dishwasher safe making this reusable. It also comes with a dome and excellent drainage.
Seed Starting 101
Seed starting is relatively easy with the best seed starting supplies, a little planning, and some consistent care. Starting seeds indoors lets you grow crops that won’t usually thrive in your growing zone by extending your growing season. Not every seed/crop should be started indoors. The best way to select the best seeds for starting seeds indoors is to look at the seed package and read the growing instructions. In general root vegetables don’t do well or squash that don’t like their roots disturbed.
You can find a great cheat sheet for starting your seeds here.
When to Start Seeds
It’s important to start seeds indoors at the correct time. If you start your seeds too early, they will outgrow their seed tray and become leggy. If you start your seeds too late, your plants will be too small and not have time for adequate root growth before you put them outside.
To determine the correct date for starting your seeds you will need to know the last frost date in your area and the recommended planting time for starting seeds prior to this (generally shown on the outside of your seed packet). I start each seed starting season by make piles of the seeds that should be started 8-12 weeks early, 6-8 weeks, etc.
It is very helpful to track all your seed starting information. You can do this in a journal, a spreadsheet or by getting a garden planner. This is the planner I’ve used in the past.
Selecting the Best Seed Starting Setup and Supplies
Once you know your seed starting dates, you can make sure you have the best seed starting supplies. You can purchase a complete seed starting kit or collect the supplies separately. Here is a list of the supplies you need:
- Seed Starting Trays – with dome
- Seeds
- Seed Starting Mix
- Grow Lights
- Heat Mat (optional)
- Watering Can (optional)
Seed Starting Basics
To get started, collect your supplies and fill your seed starting trays with seed starting mix. If the mix is dry, place it is a large bowl or bucket and completely moisten with water before filling the seed trays. If you are reusing seed trays, clean your seed trays thouroughly.
Plant each seed in a tray cell and gently pat the seeds down/cover lightly with soil. Place your seed trays in a warm place covered with a dome. Most seeds do not need light to germinate but will germinate faster with heat. You can place seeds on a heat mat or in the warmest part of your house. We have a room that has radiant floor heating and this is where we place our trays.
Ensure that the trays and seed starting mix remain moist. Once the seeds sprout, you can place the seed trays under your grow lights. Keep the lights a few inches above the top of the plants and adjust as they grow. You should water your seeds so that the seed starting mix stays moist. Seedlings typically need about 16 hours of sunlight a day.
Depending on the size of your seed tray cells, you may need to transplant your seedlings into a larger seed tray.
See how to Start Vegetable Seeds Indoors
Hardening Off Your Seedlings
Once you’ve reached your last frost date, you will need to harden off your seeds before you plant them outside. To do this, place them outside in an area protected from direct sunlight and the wind. Over 5-7 day gradually increase the length of time the seedlings spend outside. After 5-7 days, you seedlings are ready to plan outside.
When planting seedlings, use caution and try to disturb the roots as little as possible and handle the seedlings with the leaves to avoid damaging the stems.

Common Questions about Seed Starting Trays
Can you make homemade seed starting trays?
The quick answer is yes – you can use almost anything to start seeds. Ideally whatever you use at home will have some sort of built in drainage and be able to hold enough seed starting mix for root growth. I’ve seen cups, egg cartons, and take out trays all used to start seeds.
Can you reuse seed starting trays?
Yes – you can reuse seed starting trays. It’s important to thoroughly wash your seed starting trays to avoid disease of bacteria.
How do you clean seed starting trays?
There are several ways to disinfect seed starting trays. You can soak your trays in vinegar for 10 minutes and rinse completely. You can also spray your seed starting trays with hydrogen peroxide (3%) with a spray bottle and let sit for 10 minutes before rinsing. Or if you can run some seed starting trays through the dishwasher.
Have a question about the best seed starting trays? Drop a comment below.


 Just straight up homesteading ideas sent directly to you.