

Strawberries are some of absolute favorite plants to grow on our backyard farm. They are small, pretty, and produce delicious berries for years. Over the 15 years we’ve been homesteading, we’ve experimented with almost every way to grow strawberries from rows to planters to raised beds. In this article we’re sharing everything you need to know including exactly how to build and plant a stacked raised bed DIY strawberry planter. You can find supply lists as well as care instructions for maximizing your strawberry harvest.
This stacked raised strawberry bed is a great way to grow berries in a small space. If you are looking for other ideas for growing strawberries, make sure to check out:
- Growing Strawberries Vertically: Ideas for how to Skyrocket Your Harvest
- How to Make an Easy DIY Vertical Strawberry Tower with PVC or Wood
- The Best Way to Grow Strawberries: A Comprehensive Guide for Home Gardeners


Contents
Benefits of a Stacked Raised Bed Strawberry Planter
Depending exactly on your homesteading situation, there are many ways to grow strawberries successfully. While planting in rows or raised beds can be an easy solution, growing strawberries vertically has many advantages. Even when we are growing our strawberries in raised beds we also like to grow some strawberries in our flower beds and a few right on our patio in vertical planters. Here is a list of some of the benefits of growing strawberries in a stacked raised bed:
- Optimization of space: Growing strawberries vertically in a raised bed allows you to make efficient use of limited space. By utilizing vertical height, you can maximize your strawberry yield without occupying excessive ground area. This works especially well if you only have a patio or balcony or are simply limited in space.
- Improved Air Circulation: Vertical planters promote better airflow around the strawberry plants, reducing the risk of fungal diseases. Adequate air circulation helps to keep the plants dry and prevents the development of common issues like rot or mildew. This also helps keep the berries off the direct ground.
- Easy Access and Maintenance: A vertical raised bed brings the strawberries to a more accessible height, making planting, watering, and harvesting a breeze. You won’t need to bend down or kneel for extended periods, which can be beneficial for individuals with mobility issues or back problems.
- Enhanced Drainage: Vertical raised beds provide excellent drainage for strawberry plants. The elevated position allows excess water to drain away efficiently, reducing the risk of waterlogged roots and root rot. This can be a plus and a negative as raised stacked beds tend to dry out quickly and need additional watering.
- Visual Appeal: Vertical strawberry planters can be visually stunning and add a touch of beauty to your garden or outdoor space. The lush green foliage and vibrant red berries cascading down the tiers create an eye-catching display that can be both decorative and functional.
- Pest and Weed Control: Elevated vertical planters can help deter pests and unwanted critters from reaching your strawberry plants. It becomes easier to implement protective measures like netting or companion planting to keep pests at bay. You may also have more options for where to place your strawberries. Additionally, the raised height can help reduce weed growth, minimizing competition for nutrients and resources.
- Extended Growing Season: Vertical raised beds can provide better sun exposure to the strawberry plants, allowing for extended growing seasons. The increased exposure to sunlight can help accelerate growth and promote earlier fruiting, giving you a longer period to enjoy your homegrown strawberries.
- Creative and Versatile Design: Vertical raised beds offer endless possibilities for creativity and customization. You can experiment with different materials, shapes, and designs to match your garden’s aesthetics and adapt to the available space.
See the Best Strawberry Planters for growing strawberries in containers.

A Few Details about this Stacked Raised Bed DIY Strawberry Planter
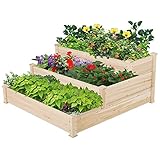
The raised and stacked DIY strawberry planter we built was very quick and easy to build. This planter has 3 square tiers stacked on top of each other. I’ve seen multiple designs that use either rectangular shaped bed or stack the tiers in a different way. I found this method very easy and effective. If you want a larger planter, you can also add another tier (I would recommend adding a bottom tier).
Materials and Tools Needed
Here is a quick list of the materials needed to make this Stacked Raised Bed DIY Strawberry Planter. I’ve included some specific details about some of the items on the list:
- Wood (choose weather resistance wood such as cedar so it doesn’t rot and you don’t use treated boards with your plants) You can use many different sizes of wood in terms of the width of the board (obviously the wider your board the taller your planter). Cut your boards into the following lengths:
- 2 boards – 24 inches
- 2 boards – 22 7/8 inches
- 2 boards – 17 inches
- 2 boards 15 7/8 inches
- 2 Boards 12 inches
- 2 boards 10 7/8 inches
- Exterior wood screws (a minimum of 24 screws) make sure they are long enough to go through your boards (if you board is 1/2 thick, you want at least 1 inch screws)
- Exterior Wood Glue
- Potting Soil (I mixed potting soil with compost for a rich but well drained soil)
- Strawberry Plants (9)
Tools:
- Saw – I used a circular saw but you can use what you have available
- Drill with a drill bit just a bit smaller than the screws
- Shovel
We found the wood at our local lumberyard and already had the other supplies and tools on hand making this not only an easy build, but a relatively inexpensive build. The most expensive part of making the DIY strawberry planter was the cost of the cedar boards.

Step-by-Step Instructions for Building a Stacked Raised Bed Strawberry Planter
In the next section, I will take you step by step through building the stacked raised bed strawberry planter.
Step 1: Cut Wood to Size
Start by cutting your boards to size. I used a circular saw, but you can also use any saw you have available to you. After you make the cuts, lightly sand the edges and sand down any rough areas.
Step 2: Assemble the Raised Bed Squares
Next, drill holes in the end of the longer boards for each square – drill 2-3 holes depending on the width of your boards. Run some wood glue along the joint and screw the boards together. Overlap the boards so that the longer boards go over the end of the shorter boards.
You should end up with 3 squares.
Step 3: Stack the Raise Beds
Stack the raised bed by alternating the directions. To keep the beds from sliding off each other, I recommend attaching the beds, but this step is optional. To attach the raised beds, drill a small hole where the the raised beds meet. I then cut off the end of a small nail with wire cutters and put the nail upside down in the hole. Simple put the raised bed on top of the nail in place and hammer it down.

Step 4: Put the Tiered Raised Strawberry Planter in Place and Fill
Choose a sunny location for your strawberry bed. If you are planting on a spot with lots of weeds, cover the area in weed cloth or cardboard before placing the strawberry bed on top. Fill with soil with drainage and compost. I mixed potting soil, compost and some topsoil to fill the bed. Tap the soil down well and water well to help the soil settle. If you can let the soil settle for a few days before planting your strawberries and add more soil as needed.
Step 5: Plant your Strawberries
This design lets you plant 9 strawberry plants. Plant 1 plant in each opening of the DIY strawberry planter. If you are planting plants, plant them at the same level as the soil in the pot. If you are planting bareroot strawberries, make sure to spread the roots. See more about planting bare root strawberry plants.
Selecting, Planting, and Caring for Your Strawberries
Below you can find some additional tips on choosing the right strawberries for this DIY vertical planter as well as some suggestions on how to plant and care for your strawberries.
Choosing the right strawberry varieties for the planter:
Select strawberry varieties that are suitable for container or raised bed gardening. Look for compact or trailing varieties that thrive in confined spaces and produce well in vertical planters, such as ‘Alpine’, ‘Tristar’, or ‘Mara des Bois’. See more about choosing the best strawberry varieties.
B. Preparing the soil and ensuring proper drainage:
Prepare a well-draining soil mix by combining equal parts of high-quality potting soil, compost, and perlite. Ensure the planter has adequate drainage holes or a layer of gravel at the bottom to prevent waterlogging and promote healthy root growth.
Caring for newly planted strawberries:
Water the newly planted strawberries thoroughly after planting and ensure the soil remains consistently moist but not waterlogged. Apply a layer of organic mulch around the plants to conserve moisture and suppress weed growth. Monitor the plants for signs of pests or diseases and take appropriate measures to protect them.
Watering and irrigation tips:
Provide consistent moisture to your strawberries by watering them deeply and evenly. Aim to keep the soil consistently moist but not waterlogged. Consider using a drip irrigation system or soaker hose to deliver water directly to the plants’ roots and minimize evaporation.
Fertilization and nutrient management:
Feed your strawberry plants with a balanced organic fertilizer only as needed, following the package instructions for application rates. Apply the fertilizer in early spring and again after the first harvest. Monitor the plants for signs of nutrient deficiencies, such as yellowing leaves, and adjust your fertilization accordingly.
Weed control and mulching:
Prevent weed competition and conserve soil moisture by applying a layer of organic mulch, such as straw or wood chips, around the strawberry plants. Mulching also helps to regulate soil temperature. Regularly inspect the mulch and remove any weeds that may emerge to keep the strawberry bed clean and free from competition.
Pest and disease prevention strategies:
Protect your strawberries from common pests like slugs, snails, and birds by installing physical barriers, such as netting or mesh covers. Monitor the plants regularly for signs of pests or diseases, such as aphids or fungal infections, and take appropriate measures, such as using organic insecticides or fungicides, to control the problem.
Regular maintenance and monitoring:
Engage in regular maintenance tasks such as pruning runners and removing damaged or diseased leaves to promote plant health. Monitor the plants for signs of stress or disease, and take prompt action if any issues arise. Regularly inspect the strawberry tower for stability and make any necessary repairs to ensure the structure is secure.
Harvesting and Enjoying Your Homegrown Strawberries
Harvesting your strawberries is an exciting and delicious part of growing them! To know when your strawberries are ready to be picked, look for bright red color all over the berry. Gently tug on the strawberry, and if it comes off easily, it’s ripe and ready to be harvested. Be careful not to squeeze or pull too hard, as strawberries are delicate. It’s best to use a pair of scissors or garden shears to cut the stem just above the berry.
Once you’ve harvested your strawberries, it’s important to handle them with care. Place them in a shallow container or basket to prevent bruising. If you’re not going to eat them right away, store them in the refrigerator, unwashed and with the green tops intact. Strawberries are best enjoyed fresh within a few days of harvesting, but if you have a lot, you can freeze them for later use. To freeze, remove the stems, wash and dry the berries thoroughly, and then place them on a baking sheet in a single layer. Once frozen, transfer them to a freezer-safe bag or container.
Now comes the fun part – enjoying the fruits of your labor! There are so many delicious ways to enjoy your freshly picked strawberries. You can eat them as is, dip them in chocolate for a sweet treat, or add them to smoothies and salads. They also make fantastic additions to desserts like strawberry shortcake, pies, and tarts. Don’t forget about homemade jams, jellies, and preserves, which can be made with your harvest and enjoyed throughout the year. So get creative and savor the juicy and sweet flavors of your homegrown strawberries!
Summary
By following this step-by-step guide, you can create a beautiful and functional stacked raised bed DIY strawberry planter to grow an abundance of delicious strawberries right in your own backyard. Get ready to savor the sweet taste of homegrown berries and enjoy the satisfaction of your DIY gardening project.


 Just straight up homesteading ideas sent directly to you.