

If you are lucky enough to have maple trees on your property (or have a neighbor that is willing to let you tap their trees) it is well worth your time to learn how to make maple syrup by tapping your trees and boiling sap into syrup.
This article will teach you everything you need to know about how to make maple syrup and is designed specifically for small scale production. Make maple syrup with just a few simple supplies and you will have your own maple syrup all year long.
We’ve been tapping our maple trees for the last 8 years. Over the years we’ve tried different taps, buckets, and evaporators. We typically put in about 12 maple taps which gives us enough syrup for our family for the year and a little extra to share with friends.
We’ve also toured many different larger scale maple producers and will share everything we have learned including the best maple syrup supplies and equipment. Below we will share how to tap your trees, all the maple syrup supplies you will need, what to expect in terms of a sap to syrup ratio, and all the steps for how to make maple syrup.
See our top tips on making maple syrup.
As an Amazon Affiliate I may receive compensation from the links on this page.
Contents
A Quick Overview: How to Make Maple Syrup
You’re probably here because you’re wondering – how do you make maple syrup? The process of making maple syrup from sap is relatively easy, especially when you are doing small scale sap collecting and evaporating. The steps below outline the general process and you can read more below for more specific details, as well as the exact process we use to make syrup.
- Identify your maple trees. The best maple tree for syrup collection is a sugar maple although you can tap a red maple tree.
- Using a spile, tap your maple trees and add a bucket to catch the maple sap as it drips out of the tree
- Collect your maple sap from the buckets in a larger collection area
- Boil your maple sap until it reaches 219 degrees F
- Filter your maple syrup to remove debris
- Bottle or can your maple syrup

Maple Syrup Supplies
To get started, you will need some basic maple tapping supplies and equipment for boiling your sap. I suggest you buy the essential items in the first year and then get additional items as you need them. If you are starting from scratch, I recommend reading the article listed below that goes into more details about the best maple syrup equipment:
Learn more about the best maple syrup supplies.
You can purchase your supplies online or at a nearby farm and feed store, or look for them used. If you are just starting you may want a kit like the one below.
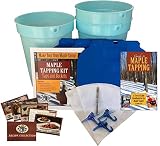
If you are planning to put in just a few taps, this is a good option as it comes with the taps, buckets, drill bit, and some information about tapping your trees. If you are planning to tap more trees, you are probably better off getting the supplies separately.
List of Maple Syrup Tapping Supplies and Maple Syrup Boiling Supplies
- Maple sap taps called Spiles (you can get the tradition looking metal spiles, or plastic spiles with tubing (the metal ones look a bit better, but the plastic spiles are better for your trees). If you get the plastic spiles you will need tubing as well.
- Buckets – depending on the type of spiles you get, you will either need buckets that hang from the metal spiles, or you can purchase a 5 gallon plastic bucket with a lid.
- Drill bits – depending on the type of spiles you will need drill bits that are the size of your spiles to make holes in the trees. A 7/16 drill bit is typically good for the traditional spiles and smaller 5/16 drill bit works well for the plastic spiles, but you should double check with the specific spiles you decide to use for the best drill size
- Larger collection container (optional). If you are going to collect your sap everyday but only boil your sap every few days, you will need a place to store your syrup. You can get several 5 gallon plastic bucket with a lid – we use a rain barrel like this one with a open top for pouring in the syrup
- Evaporator – this is the most expensive part of making maple syrup, and there are several options. You can make your own evaporator, boil in a stove or grill, or purchase an evaporator.
- You will need a candy thermometer and a filter for finishing your maple syrup
- Containers to can or bottle your syrup.
The first year we tapped our trees, we boiled a small amount of maple sap directly on the stove. This is not great for your home in the long run since it adds a lot of humidity to the home. Next we built a small outdoor evaporator out of pans and cinderblocks. This worked well but took more time to manage and boil and got a lot of smoke into the syrup. Finally we built a larger evaporator from a barrel – this allows us to collect sap and boil outside a few days each year.
How to Identify Maple Trees
If you are looking for how to make maple syrup, you will first need to identify your maple trees. It’s best to do this when there are leaves on the trees as it can be difficult to do just with the bark. The best trees for making maple syrup are sugar maples but you can also tap red maples. The difference between sugar maple vs red maple trees is how much sap you’ll need to make syrup. A sugar maple tree produces sap with a high sugar content, the maple sap to syrup ratio for sugar maples is about 40:1, while a red maple is more like a 50:1 ration.
You can also make syrup from many other trees including black maples, birch and walnut.
Identify a sugar maple by it’s dark brownish-colored bark and sharp buds on the ends of the branches. The leaves are five-lobed and less sharp compared to a red maple. You will want to look for bigger more mature trees that are at least 10 inches in diameter. If the tree is more than 20 inches in diameter, you can put 2 taps in the tree. We have one sugar maple that we put in 3 taps.

When to Tap Maple Trees
The best time to tap maple trees is in late winter or early spring when the temperatures are below freezing at night and above freezing during the day. The best time to tap maple trees changes every year based on where you live. You will want to look for a few days in a row that have warm days and cold night before you decide to tap. It is worth looking for a local maple tapping forum if you want to see when other people in your area are tapping their trees.
Once the tree starts to bud the sap will become a cloudy color and produce off tasting syrup. The common thinking is that if you tap your tree to early, the tap may dry out and produce less sap during the key sapping season.

How to Tap Maple Trees
To tap your tree, you will want to look at your spiles and decide on the proper drill bit. Make sure all your equipment is clean. You will want to select a spot on your maple tree about 3 feet off the ground. If you’ve put in maple taps in the past make sure your tap is at least 6 inches away and not directly under last years tap. Ideally you place the tap under a branch or above a root in a healthy part of the tree.
Check out this article if you want more specifics on selecting the Best Maple Taps.
Drill your hole at a slight upward angle about 2-2 1/2 inches deep. You can wrap some tape around the bit 2 1/2 inches from the end so you can tell the depths you’re drilling. Clean out the shavings as best as possible and make sure they are light brown, indicating healthy sapwood.
Next, it’s time to insert the spiles. Place the spile in the hole – if your spiles have a hook for the bucket make sure this is facing down. Using a hammer, gently tap the spile. You may see sap start to run immediately. Do not tap too hard and you can use a piece of wood against the spile to soften the hammer blows. We’ve found that the metal spiles sometimes bend if hit directly with the hammer.
Once your spiles are in place you can attach your buckets with lids or attach the tubing and lead it into a bucket. We often run 2 spiles with tubing into one 5 gallon bucket. We drill 2 holes in the lid and run the tubing through the lid. Make sure the tubing isn’t kinked so the maple sap can run downhill into the bucket. You will see large commercial operations using vaccum tubing but for the small scale operation you will want to make sure your tubing is running downhill.
How to Collect Your Maple Sap
Your maple sap should be flowing from your spiles and collecting in your buckets. You will need to collect the sap before your buckets overflow (anywhere from 1-5 days). You will want to find a place for your sap until you are ready to boil. The size of your container will depend a bit on how many taps you have and how often you plan to boil. You can think of sap like milk – it should be kept cold and will spoil after a few days in warm temperatures and longer if it is kept cold.
We collect ours in a rainbarrel used only for this purpose. We keep the barrel in a shady part of the yard near where we boil. We put the barrel on some cinderblocks so it is easy to draw off the sap from the bottom of the barrel.

Boiling Your Maple Sap into Syrup
Now that you’ve learned how to tap your maple trees it’s time to learn how to make maple syrup from the sap. The basic idea is that you will boil your sap until it evaporates down to the correct sugar content. Since your sap will give off a lot of water vapor, it is best to do this outside, but the exact method you use depends on how many taps you have. If you just have one, it might make sense to simply boil on your stove top – otherwise you will need to build or buy an outdoor evaporator.
As the sap boils and evaporates, you can slowly add more and more sap. We find it best to warm the sap before adding it to the boiling liquid so you don’t kill the boil. As the sap evaporates the liquid will start to darken in color. You will want to keep an eye on the temperature since the temperature will only reach 219 when the sugar content is right. You can finish your syrup in your evaporator, but we like to bring it in the house on the stove top for the last part of the boil.
See more about the sap to syrup ratio.
If you over boil your syrup, it will crystalize as it cools. When you’re cooking maple syrup, keep in mind that the temperature will go up quickly towards the end. You can also directly check the amount of sugar in the syrup using a syrup hydrometer instead of using the temperature method. Look for sugar levels between 66-67%.
If you do overboil your syrup, you are better off turning your syrup into maple sugar.
Finishing Maple Syrup
Once you’ve turned your sap into syrup you’ve done the major work in learning how to make maple syrup, but you will still want to filter and store your syrup. You will want to let it cool a bit and then strain the syrup through cheesecloth or felt at least twice. We’ve also used what I call the settling method. I pour my syrup into large mason jars and let it settle for a few days – most of the materials left in the syrup will settle to the bottom. I then pour the clear syrup off the top and filter this. Otherwise I find the filter gets easily clogged.
You can take what is left in the bottom of the jar and continue to settle it or strain this separately. You can put the syrup in the fridge or for longer storage you will want to can/bottle your syrup. We usually put in about 10-12 taps each year so we keep some syrup in the fridge but since we end of with a few gallons we bottle the rest.
Learn exactly how we bottle maple syrup.
How to Bottle Maple Syrup (or How to Can Maple Syrup)
Once you have all your maple syrup you will need to decide how to store it. Since you’ve just boiled your syrup, it should be pretty clean. Make sure your bottles or jars are fully clean. Heat the syrup to 180 degrees if you’re using plastic and 190 if you’re using glass. Pour your syrup into the bottle so it fills it to the bottom of the neck and place the lid on the container. As the syrup cools it will seal the bottle. Syrup can be stored cool for up to 2 years. If you do find mold on your syrup, you can skim off the mold and reboil your syrup.

How to Make Maple Syrup – the story from our backyard farm
We’ve thoroughly enjoyed making syrup as part of our backyard farm. We first learned how to make maple syrup when we moved to NH about 11 years ago. Each year we place about 10-12 taps in 6 different trees (we have one massive tree that we put 3 taps in). This means we boil 3-4 times during the maple season. It often becomes a day event where we all spend time outside around the boiler. Once the syrup is close to finished we bring it inside to finish on the stove and settle and filter it in the kitchen.
With 10-12 taps, we get enough syrup for a year for our family with a little extra to give away. We do use our syrup for cooking, specifically making granola and we make lots of pancakes. One of our favorite things about learning how to make maple syrup is that it is done at a time of the year that not a lot else is going on on our backyard farm. It always feels like the start of the season when we get out the maple syrup supplies.
We love to use our syrup to in the kitchen on pancakes, baking, making maple extract and more.
Common Questions about How to Make Maple Syrup
Do you have a question about how to make maple syrup that I’ve missed? Leave a comment and I’ll answer it here.
How often can I tap a tree? Will it damage it over time?
Unless your tree shows stress, you can tap it every year.
Does maple syrup go bad?
I get a lot of questions asking can maple syrup go bad or expire. Theoretically unopened maple syrup should last indefinitely in the freezer, one year in the pantry, and opened syrup should be kept in the fridge for up to 6 months.


 Just straight up homesteading ideas sent directly to you.
Pingback: Maple Syrup Supplies (The Best Maple Syrup Equipment to Make Your Own at Home) - The Backyard Farming Connection
Pingback: Choose the Best Maple Taps (updated 2022) - The Backyard Farming Connection
Pingback: The Best Maple Syrup Evaporators For Sale and To Build - The Backyard Farming Connection